
Clay bricks and high alumina bricks used in the bottom of the blast furnace are generally composed of several layers of vertical brick layers (layer height 345mm or 400mm). Each layer is built into a cross shape, and some are built into a straight shape. The centerlines of the upper and lower adjacent brick layers are staggered by 30°. Among them, the center line of the furnace bottom brick on the uppermost layer forms an angle of 30°~60° with the center line of the taphole, as shown in Figure 1.
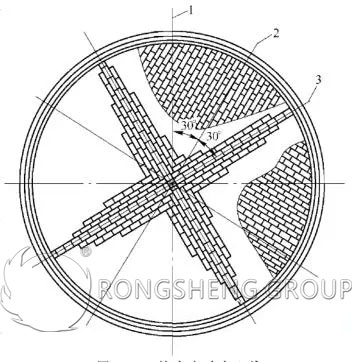
1- Taphole center line; 2- Odd number layer center line; 3- Even number layer center line
(1) There are usually two building methods for the cross shape in the center of the furnace bottom (see Figure 2).
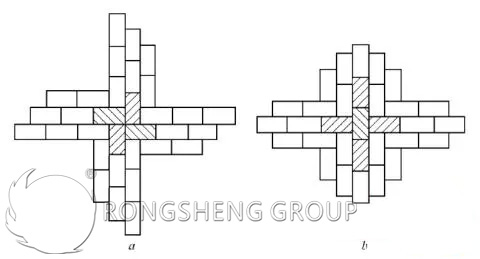
a-brick type is 400mm×150mm×90mm; b-brick type is 345mm×150mm×75mm
1) When laying masonry, pull the line according to the cross centerline drawn on the cooling wall. Accurately place four guide square timbers with flat surfaces and at right angles to each other along the line, as the basis for the masonry center cross. In order to prevent the center point of the upper and lower brick layers from passing through the seam, when pulling the center line of the upper layer brick, the center point of the upper layer brick should be staggered by half the thickness of the brick from the center point of the lower layer brick.
2) Position the center brick first according to the cross center line of the furnace bottom. That is, on the brick surface of the central brick, draw cross lines perpendicular to each other according to the equal position, so that they coincide with the cross lines on the bottom of the furnace. Then stagger half the thickness of the brick row, re-draw the cross line, and set 4 guide square logs along the line, and use this as the guide surface for masonry. As shown in Figure 3.
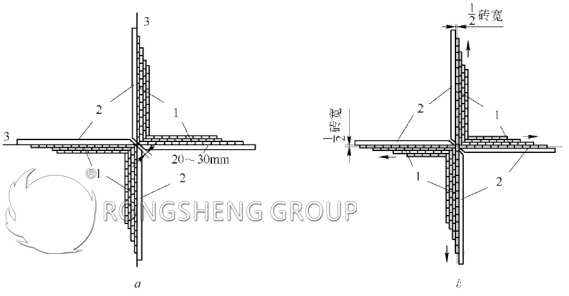
1- brick type; 2- guide square timber; 3- center line
Since the square wood has both guiding and supporting functions, the side and bottom surface of the supporting bricks must be planed and be at right angles to each other. If the square timber is set along the line, its verticality must be checked with a level ruler or ruler, and the error shall not be greater than 0.1mm. When each layer of bricks is placed on the bottom, two mutually perpendicular cross lines should be checked with a precise angle ruler to see if they are at right angles. The guide square and the drawn cross line must be strictly consistent and must not be skewed. Otherwise, the oblique laying of the cross-shaped brick columns in the center will cause a lot of processing of the entire brick layer and affect the quality of the masonry.
The cross line in the center of the furnace bottom is the key to the whole layer of furnace bottom masonry. After laying the bottom, check whether the brick joints and verticality meet the requirements. If the quality meets the requirements, then build two diagonal bricks next to the first row of bricks. After laying 3 to 4 rows of bricks and the stability of the masonry increases, the guide square timbers are removed. Then the four corners can be simultaneously bricklayed.
The bottom of high alumina brick and clay brick should be built with phosphate mud. When building masonry, the thickness of the brick joints of the masonry should be controlled strictly according to the construction specifications. The mud in the joints of masonry bricks must be full, and the consistency of the mud should be strictly controlled.
① The procedure when laying bricks. First dry the bricks, check the joints, and move the bricks to the side in turn. Then clean the working surface, spread a layer of mud, and perform the actions of brushing, dipping and kneading as shown in Figure 4. Because the phosphate mud flows faster, in order to avoid “bottom blockage”. When operating, often use both hands down, one hand to support the lower end of the brick, and the other hand to withstand the lower part of the intersection between the large surface and the side of the brick, rub the brick up and down 4 to 5 times, and then put the brick in place.
② The operation points of masonry furnace bottom bricks are: steady sticking, low leaning, short pulling and heavy kneading.
Steady sticking: Both the large and small sides of the brick are covered with mud, and it cannot be taken out as soon as it is dipped.
Low leaning: When the mortared brick is leaning against the already laid brick, it should be lowered as much as possible. In this way, most of the mud stained on the brick surface will enter the brick joints, so as to achieve the purpose of filling the mortar joints.
Short pulling, heavy kneading: the distance of pulling up and down when kneading is short, generally 30 ~ 40mm. The kneading action should be heavy and tight. After the brick is in place, it should not be too hard to hit with a wooden hammer, otherwise it will cause the mud to sink and loosen.
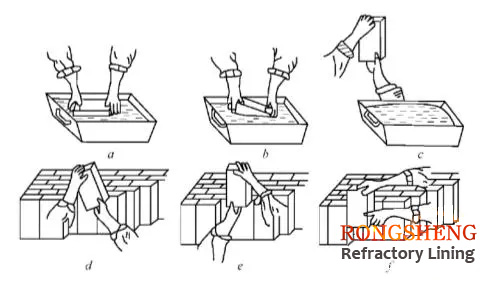
a—staining with grout; b—completed with grout; c—taking out the brick; d—ready to turn around; e—completed to turn around; f—kneading the brick
The vertical error of each brick at the furnace bottom shall not exceed 2mm. Excessive deviation will cause masonry to produce “bottom blockage”. Every time a row of bricks is laid during construction, the vertical error of the bricks in the masonry should be measured with a level ruler. In addition, the flatness of the upper surface of the furnace bottom brick layer should also be checked, and the gap should be checked with a gauge and a feeler gauge. Then measure the relative elevation difference of each point in the scene. Use an angle grinder to grind and level the partially raised areas to facilitate the construction of lower furnace bottom bricks. There is an expansion joint of 100~150mm between the furnace bottom masonry and the cooling wall (or the protective wall of the carbon block), and the carbon material is filled inside, and the compression ratio should not be less than 40%. In order to avoid massive processing of bricks, all places less than 1/2 brick width at the edge are filled with carbon materials.


